(in italian)
Diego’s Game Design Insights: Control
(in italian)
StarCraft II API – Setting Up Your Bot

As you may know, Blizzard has finally released the long-awaited StarCraft II API: now you can make some nice and cute bots using an official library. Blizzard released tons of stuff, we have:
- API Library, which is all you need to get a StarCraft bot up and running;
- API Protocol, all the magic that makes the API work, the bridge between API and StarCraft itself;
- PySC2: a learning environment developed by DeepMind.
In these days I’ve been playing with the API Library and I’m building simple bots to understand its capabilities and explore some AI techniques that can be applied in StarCraft. If you download or clone the Blizzard API repository from GitHub, you will see that there is some documentation and it comes with neat tutorials on how to get your hands in the code.
In this brief article I’m going to share how to create a project from scratch and set up visual studio for StarCraft Bot development, using the new API. This is pretty basic stuff, but if you are unfamiliar with Visual Studio and external libraries, or you just want to jump into the API itself, this can be handy and avoids you all the issues you may face.
1. Download precompiled libraries here and extract the files on your PC. From now on, I’ll be referring at them as StarcraftAPI folder;
2. Open Visual Studio (I used VS 2017) and create a new project -> empty project;
3. We will add some basic code that writes “Game Started” on the Bot debug window. Here’s the code we are going to use:
#include <sc2api/sc2_api.h>
#include <iostream>

using namespace sc2;

// Our bot
class MyFirstBot : public Agent
{
    public:
        virtual void OnGameStart() final override
        {
            std::cout << "Game Started";
        }
};

int main(int argc, char* argv[]) {
    MyFirstBot bot;

    // Init the game we are going to play using the coordinator
    Coordinator coordinator;

    coordinator.LoadSettings(argc, argv);
    coordinator.SetParticipants({
    CreateParticipant(sc2::Race::Terran, &bot), // us
    CreateComputer(sc2::Race::Terran) // standard SC AI
    });

    // Start the game in the specified map
    coordinator.LaunchStarcraft();
    coordinator.StartGame(sc2::kMapBelShirVestigeLE);

    // perform game steps (needs to be done "manually")
    while (coordinator.Update()) {}

    return 0;
}
4. Let’s setup our solution right-clicking on it and selecting “Properties”:
4.1 Select VC++ Directories, modify “Include Directories” and “Library Directories” to contain StarCraftAPI\include and StarCraftAPI\lib folders respectively. You should see something like this:

(of course relative paths are often better in these cases 😛 )
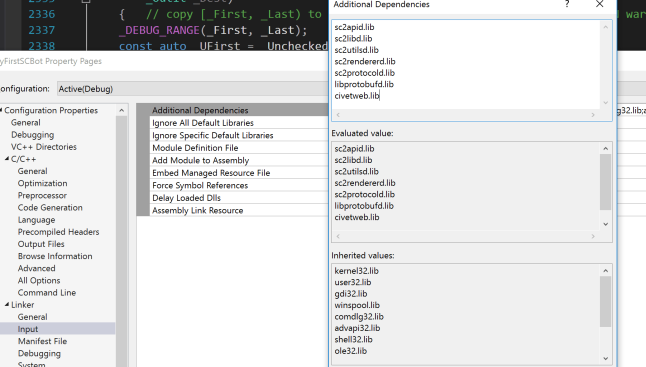
4.2 Now Visual Studio knows the additional directories coming from the API, let’s feed the Linker with the library names we need by clicking in Linker -> Input. Write down the ones below:
sc2apid.lib
sc2libd.lib
sc2utilsd.lib
sc2rendererd.lib
sc2protocold.lib
libprotobufd.lib
civetweb.lib
4.3 Apply our updates and close the Property window.
NOTE: be sure to modify the correct Configuration and Platform, otherwise we changed setup for something different.
5. In our code snippet we selected a map, so be sure to copy the “maps” folder inside StarCraftAPI\project\maps into your working directory (usually the one with the .sln in it).
6. That’s it: build and run your bot!
Issues:
- You may need to add -D_SCL_SECURE_NO_WARNINGS flag inside Project Properties, under c/c++ -> Command Line if you have issues similar to “std::copy::_Unchecked_iterators::_Deprecate: Call to ‘std::copy’ with parameters that may be unsafe”;
- If you have linking problems, try checking project properties -> c/c++ -> Code Generation Runtime Library field: it should be set to Multi-threaded Debug (/MTd).
More issues? I wrote something wrong? Let me know in the comments.
Know Your Role – Game Development
It has been a lot of time since my last post! In the meanwhile a lot of things happened, but well, that’s not the point of this post.
Today I want to share a very basic knowledge of the common roles you can find in the Game Development field, just to help those people who still are not sure of what to do or what to study. Note that there is no general rule to define these roles, this is only how I see the organisation of a team in a Game Dev studio – just a pretty basic and very generic representation. We can find four main macro jobs:
Programmers
People who write code. They are generally responsible for all the software that the studio builds. There are quite a few typologies for a programmer which vary according to the goal the programmer has to cope. Just to list a couple of them: we have Engine Programmers taking care of the “system” that runs the game; Gameplay Programmers, specialised in one or more area, who implement the actual game and often interact with Game Designers; Tools Programmers, building off-line software that is used by other people in the team; Technical Directors, that follow the project on a more high-level, technical view.
Designers
Game Designers have just one major tough task and, as you may imagine, is to design the game. This typically means think about what the gameplay of the game will be. This involves game mechanics, player interaction, missions, story etc. Some designers can also be more technical, modifying game data, writing high-level code (such as scripts) and working closely with Gameplay Programmers.
Artists
An artist has to do with game assets: models, animations, cinematic, concepts, audio and so on. It is a fundamental role which includes very specific jobs and, in most of the cases, their work is what the player will notice as one of the first things – from the game trailer, to the first screenshots of the game. The main categories here are the Concept Artists, who transform designer vision into a drawing used for further development; 3D modelers, making the geometry that will be used in the game such as characters, props, weapons; Animators, providing the characters smooth movements and actions that will be used in game.
Producer
Usually a producer has to do with scheduling the game milestones and taking care of the general development. Often this job has more to do with the “business” part, since a producer should take care of delivering the project in time and with as less problems as possible. Sometimes a producer can also influence the evolution and the development of the game.
I hope I have listed the major roles in a clear way and clarified any doubts.
Compiler, Linker, Assembler and Loader: an overview
It is nice for a programmer press that shiny green play button on top of Visual Studio and see his/her application run in the current machine. But, what kind of “magic” is hidden underneath that button? This blog post is a gentle overview of the process that is behind the compilation/running task based on my curiosity on the topic; I will focus on C++ and g++ compiler-driver.
The Four Horsemen
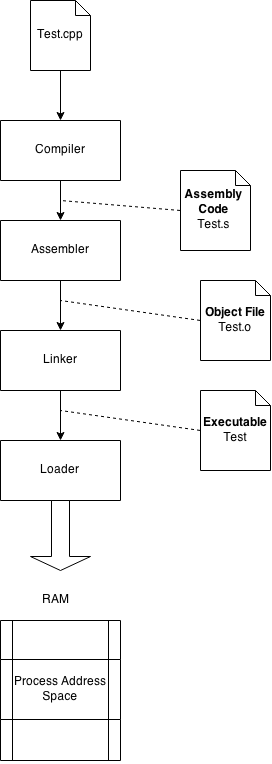
Our PC doesn’t understand C++ or any other language, except for machine code. The machine code is a sequence of instruction written in binary that can be executed directly from the CPU. So, how is our C++ application able to run if it’s not written in machine code? If we are able to run our application is thanks to four main tools: compiler, assembler, linker and loader. A brief overview of the building process is depicted in the following figure.
Compiler
Before our source files are given to the compiler, a preprocessing stage occurs. In this stage the preprocessor deals with include-files, conditional compilation instructions and macros and produces a file that is then given to the compiler. Header files are not seen by the compiler; the preprocessor, in fact, replaces every #include statement in .cpp files with the code written in the respective header file. Let’s make a small test.
Test.h
#ifndef TEST_H
#define TEST_H
// A test class, containing two functions and an integer member.
class Test{
public:
    Test();
    Test(int value);
    int getMember()const;
    void setMember(int value);

private:
    int member;
};

#endif
Test.cpp
#include "Test.h"
//Test class implementation
Test::Test()
    :member(0)
{}

Test::Test(int value)
    :member(value)
{}

void Test::setMember(int value)
{
    member = value;
}

int Test::getMember() const
{
    return member;
}
main.cpp
#include <iostream>
#include "Test.h"

int main()
{
    Test test;
    std::cout << "The int member is currently: " << test.getMember() <
    test.setMember(10);
    std::cout << "The int member is currently: " << test.getMember() <
   return 0;
}
Now let’s open the command line and use g++ to see what is the preprocessor output (you can use whatever C++ compiler you like).
The command to use is
g++ -E Test.cpp -o preprocessed_test.ii
which will only preprocess (-E) our Test.cpp file and put the result into preprocessed_test.ii (-o flag). The extension .ii is not casual: according to the gnu documentation, ii files are (C++) files that do not need to be preprocessed.
If you open preprocessed_test.ii, it will look like this.
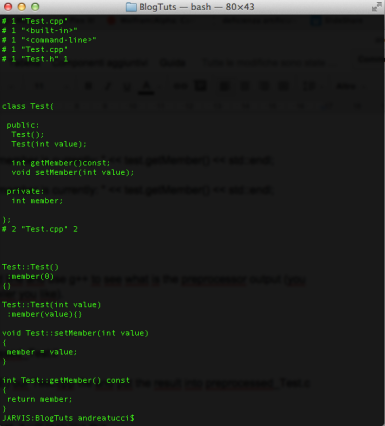
If we want to preserve our comments, just add the -C flag to the previous command. Let’s do the same for our main file, with
g++ -E main.cpp -o preprocessed_main.ii
Examining proprocessed_main.ii we can see a very long file, which is the result of including iostream header file.
The compiler is fed with the preprocessed file we just generated and, in turn, it creates assembly code. In our experiment, we can use
g++ -S preprocessed_test.ii -o assembly_test.s
g++ -S preprocessed_main.ii -o assembly_main.s
to generate the assembly code. The extension .s denotes assembler code. Assembly_test.s will look like this

This is the end of the proper “compiling” stage, as we reached assembly code.
Assembler
The assembler aim is to build an object file. An object file is basically our source file translated in binary format. To assemble our test, run
g++ -c assembly_test.s -o object_test.o
g++ -c assembly_main.s -o object_main.o
With the -c flag, we are telling g++ to just compile (in this case to just assemble) our input, skipping the linking step, which will be discussed in the next section. An object file can come in different forms, such as ELF (Executable and Linking Format) on Linux systems and COFF (Common Object File Format) on Windows. An object file is made of sections, containing executable code, data, dynamic linking information, symbol tables, relocation information and much more. If we want to inspect what an object file is and what it contains, we can use tools such as objdump or readelf. On my macbook I have installed the macports version of objdump, gobjdump, used for our example.
gobjdump –all-headers object_test.o
Will give us human-readable information about the object files:

What are all those sections and what is their meaning? Some of them are described below.
- .text section contains the executable code; this section is the one affected by compiler optimizations;
- .bbs section stores un-initialized global and static variables;
- .data part is responsible to store initialized global and static variables;
- .rdata contains constant and string literal;
- .reloc holds the required relocation information of the file;
- The symbol table contains pairs of type <symbol,address>. It is used to lookup the addresses of a symbol in the program;
- The relocation records helps the linker to adjust other sections.
Let’s now look at a simple assembly program (x86) here
Do you see something similar?
Linking
The linker produces the final executable, that can be run by our machine. As the word suggests, the linker links all the object files together, allowing separate compilation. In short, the linker calculates the final address of the code and resolves all the external references present in each object file.
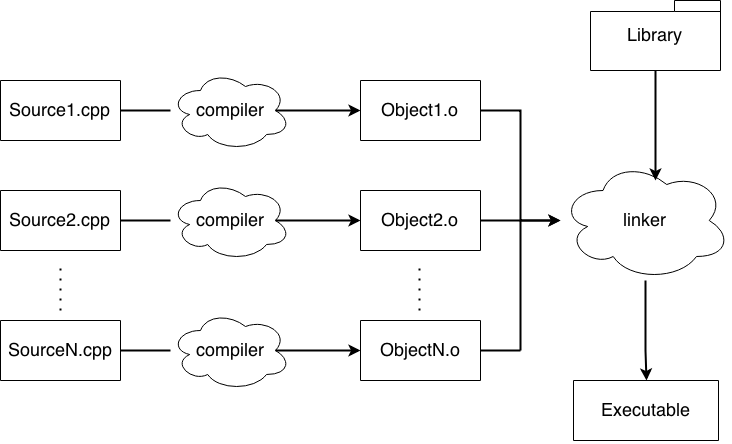
In our example, we have two files, main.cpp and test.cpp; in our main function there are some references to functions defined in test.cpp, so we need to connect those two files somehow. The linker takes as input our object files and other compiled source code (such as libraries) and gives us an executable as output, resolving all the references between the files.
In order to complete its job, the linker uses the relocation records and the symbol table: relocation records are used to find the addresses of the symbol referenced in an object file, for example if we call the Test setMember function in our main, we will have a relocation record for it in main.o so that the linker can substitute the actual instructions from test.o; the symbol table is used to resolve all the references among the different object files. Let’s see how this works briefly.
Executing objdumb with object_main.o as input and search for the Symbol Table (or, alternatively use the –syms flag), we can see that some symbols are undefined.

These symbols refer to functions defined in Test.cpp. In fact, if we examine object_test.o, the same symbols will be defined, take the setMember function as an example.

To generate our executable run:
g++ object_main.o object_test.o -o program
If we now examine program with objdump, we will have all the symbols defined. Thanks, linker!
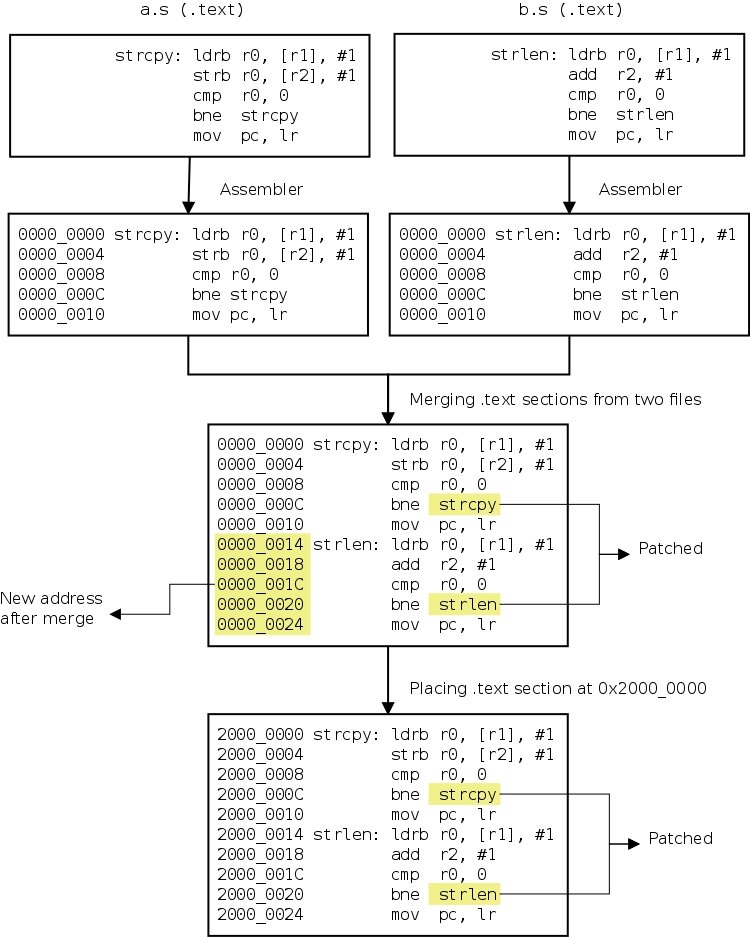
Relocation
The main effects of the linker relocation is to produce the final addresses for the labels present in our program. This means that the addresses assigned before the linking stage are temporary and relative. Relocation can be split in two sub-tasks: section merging and section placement. The first is simply a matter of merge the same sections present in our object file into the executable. This means that in our file, the .text and the .data sections will be the result of the merging of the same sections in the object files; the addresses will be affected by the merging. The section placement is to set the starting memory address where all the addresses have to refer to: usually they are relative to the address 0, but after the placement stage all the addresses are shifted by the starting index.
The following image, taken from this page, will summarize and visualize in a great way the relocation passes.
Linker and Libraries
In our code, it is possible to include libraries and pre-compiled code; this means that the linker should consider the library as well to produce our executable. We can define a library as a collection of object files, that can be used in external programs. With static linking, all the files are linked during link time, resulting in an executable file. All the symbols and the information needed by the program is known before running our code; this type of libraries have usually the .a extension. Since we need all the information stored before run time, static linking produces big files.
Another option is to use dynamic linking. In this case, the linker places information into the executable to inform the loader where to find the library, which is bound in runtime, just before the program is executed; this type of libraries have usually the .so extension. So, why one should use dynamic linking? Dynamic linking makes the size of the executable smaller; a library can be updated without re-linking; it permits to share read-only library modules, so that less memory required.
Loader
After we came up with an executable file, we can run it on our machine. The first step is to load the program in memory (RAM) and this task is accomplished by the loader. In the first place, the loader validate the program by computing the memory requirements and checks its data type, instruction set etc; secondly it allocates the memory needed, copies the .text and the .data sections into the RAM, fills the program stack with program arguments and initializes registers, setting the stack pointer on top of the program stack and cleaning all the rest. The final operation is to execute the main function.
The program is now running on our machine.
References:
https://gcc.gnu.org/onlinedocs/gcc-4.0.4/gcc/Overall-Options.html
http://www.bravegnu.org/gnu-eprog/linker.html
http://www.tenouk.com/ModuleW.html
Game Engine Architecture by Jason Gregory

Global Game Jam 2015 Postmortem

Hello everyone, in this post I would like to share my experience of my first global game jam, that was held at the end of January. A little bit of introduction first: I moved to Dundee, Scotland, in September 2014 to get my master degree in games development. I have always been passionate about making games, but my bachelor degree took me a lot of time; once finished, I decided to focus my studies on game development to improve my knowledge about game development and to build my portfolio. If we add that I am Italian, living in the south of the country, it is not so hard to figure out why I have never had the chance to participate to something like a game jam before (if you are asking why, take a read here or here (italian)).
That said, I was really excited to take part to my first global game jam. I was excited and I felt like going out with my friends on a saturday night — just doing something different. I joined the other developers to watch the video that revealed the year theme: “What do we do now?”. And literally, I was thinking the same “What do I do now?” . I was a mix between excited and confused, wondering what I would have done in 48 hours. At the end, we formed a team of 5 people composed of member of my postgraduate course: two programmers, two artists and one audio guy. The way we came up with the concept of the game is pretty similar on how I used to make songs with my old band: improvisation, madness and lot of efforts. Another analogy with the music creation process is that everyone puts some ideas in, modifying the main concept. It was very cool how the game changed with everyone’s ideas, I would say very different on how we use to make games for our degree, since it resembles more how a professional game is built. I think a developer has to know both of the methods, because it is important to develop someone else ideas, but also have our own way to create things.

Back to the jam, the idea was simple yet effective: two thieves, chained together, trying to rob an house. The two thieves discovers that the house is occupied by a scary dog, that is going to bite them! The main goal of the game is actually escape from this house, trying to dodge the dog. The fact that the thieves are chained, forces the player to collaborate, because the chains limit the players movements. So the players should carefully plan their movements and which room to visit, searching for the exit. What do they do now?

For the development of the game, we choose Unity, because I think it’s one of the fastest game engines to build a prototype. The aspect that added excitement and makes us enjoy even more the game jam, was that it was our first time using Unity. We just looked to some very basic tutorial, covering an introduction to the game engine and the basic notion that every Unity developer should know. This was a few weeks before the game jam, but we actually learned it during the development. To be honest, I usually like to know the tool/language I am going to use before actually using it, but it was a very nice experience deal with something new to build a game in 48 hours. And we did it! I like to think of the game jam as a way to express yourself within a limited amount of time, just to say “okay this is what I thought and what I could do in that amount of time”. I didn’t know I would have liked it so much! I am the kind of developer that prefers to make a game having time, thinking to more than one approach for a given problem, thinking about reusability etc, but, as I said earlier, I think having more than one “weapon” in our knapsack can be only beneficial!

I really enjoyed coding for that amount of time, alternating learning, adding features, debugging, breaks in such a small amount of time. The environment was also great: people put music after midnight and that contributes to the overall feeling of the jam: just normal people who love what they do and want to show it. As the video of the global game jam suggested, is not really about the game, is about “showing up”.

Thanks to all the developers who took part to the jam all around the world, who shared the passion of making games in this fantastic event. It was an amazing experience, where I learned a lot, improved myself, had fun and well.. made a game!
Project Pitch: Answer Set Programming for Procedural Content Generation
Hello everybody, today I presented my project idea for my innovation module. I’ll use answer set programming paradigm, with the ACTHEX extension, in order to procedural generate game levels. I think that the topic is quite exciting! If you are inteterested as well, here are some links:
ASP introduction
http://www.kr.tuwien.ac.at/staff/tkren/pub/2009/rw2009-asp.pdf
ACTHEX
http://www.kr.tuwien.ac.at/research/systems/dlvhex/actionplugin/files/acthex.pdf
Procedural Content Generation Wiki
N-Grams and Introduction to Bayes Inference
Hello folks, I have made this slide for my AI for Games course. I hope you find the topics interesting.

Angry Birds Artificial Intelligence Competition
During this summer I participated with my university in the AIBirds competition. The competition focuses on building a bot for Angry Birds game and make it play a certain amount of levels. A brief description of our bot is available here. Our agent is based on logic programming, using the Answer Set Programming paradigm. I’m going to make another post with detailed information of our work soon.
Github Student Pack
If you are a student, be sure to check the student developer pack offered by github: it contains a lot of useful software that is *free* for student. Most of them are free for a period of time, but it worth to have a look! The only thing you have to provide is a valid institutional email address.
